
Vintage Hoop by Ola Khomenok

Hello dears!
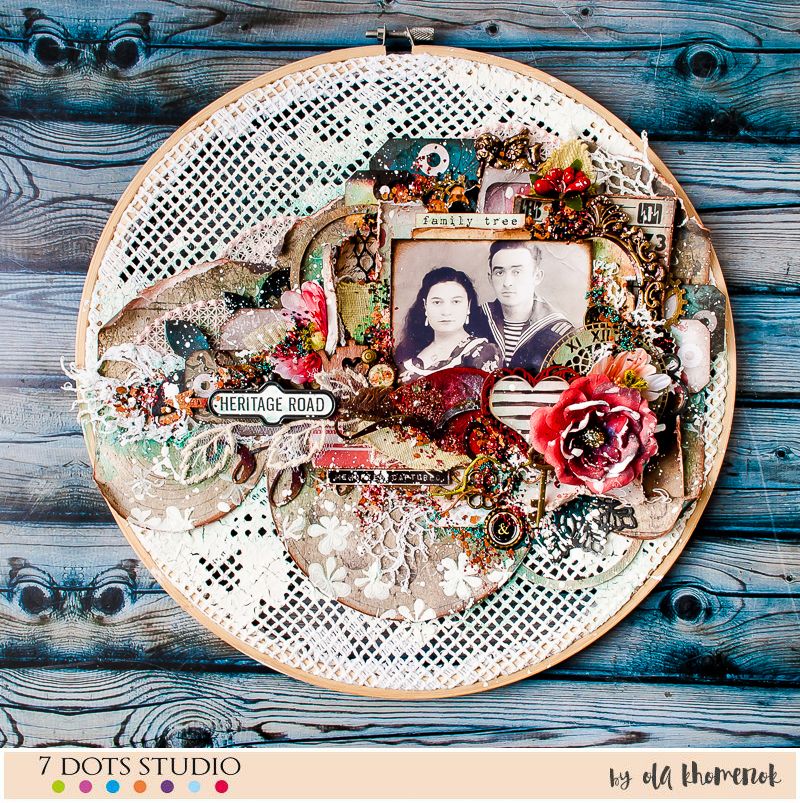
Today I would like to share with you my new altered hoop, with a photo of my grandparents, when they were young.


I decided to turn an embroidery hoop to a Vintage frame, which can hold my family’s memory. I describe the process in a step by step photo tutorial.
1.I starched a piece of Vintage crochet map on the hoop

2.I glued the edges on the back side of the hoop

3.I added a random layer of White Gesso on the fabric

4.I created a dimensional layering under the photo, using a few papers from Homegrown and Fortune-teller 6×6 pads

5.I also decided to add a little bit of Crackle white paste on the fabric

6.For the background under the photo cluster I choose 7 Dots Studio – Fortune-teller – Charted paper

7.I added texture to the background paper using Home Grown floral stencil and modeling paste

8.I placed the photo cluster and added a few pieces of Vintage crochet

9.Next, I added Bigshot die cuts and started to build the whole composition. The bigger elements, like flowers, I placed around the photo and added a few tags between the cluster layers. The smaller elements I located in a line from the photo to the edge of the hoop. To make my composition more interesting, I added a lot of small embellishments, like brads, wooden teapot and etc.

10.To complete the decoration of my hoop, I prepared a several custom made embellishments: Fortune Teller chipboard die cuts and paper clay elements I coloured with Art Alchemy Metallique paints and Mica powders.

11.Then I glued all elemants to the hoop and added some shading with acrylic paints.
12.The final touch was to add red and black glitter, micro beads and splashes with white gesso diluted with water.
7 Dots Studio supplies:
Fortune-teller – Die-cut Elements 6×12
Fortune-teller – Tags 12×12
Fortune-teller – Charted
Fortune-teller – Pad 6×6
Homegrown – Element Stickers 6×12
Homegrown – Floral Stencil
Homegrown – Tags 12×12
Homegrown – Pad 6×6
Dreamscapes – Tags 12×12
 |
 |
 |
 |
 |
 |
 |
 |
 |


Beatrice
What a great idea to use the crochet piece! Never thought about it.
Ola Khomenok
Thank you Beatrice!